Showing posts with label step card. Show all posts

Thursday, October 5, 2023

So why did you choose thatπŸ‘‡?

 Today I'm back to share a layout made using a bunch of odds and ends 

that I had left over in my hoarder-like chipboard collection 😜 

I thought it migth be a good opportunity to unpack the reasoning behind colour and embellishment choices.


I've been a scrappr for about 25 years now so when I say I have 'leftovers' ...
I mean I have enough to open a small shop! lol 😬 

So I don't reach for the 'perfect' paper to go with a photo anymore... I reach for the ones I can make work from my extrodinaryly large stash of papers, but here's what I found to be true on this journey - with the right colours and some coordinating embellishments it turns out its quite easy to use up all those last few bits of chippies in the bottom of packets, the leftover stickers and the random bits of paper floating around from a long gone collection! 

For example ...

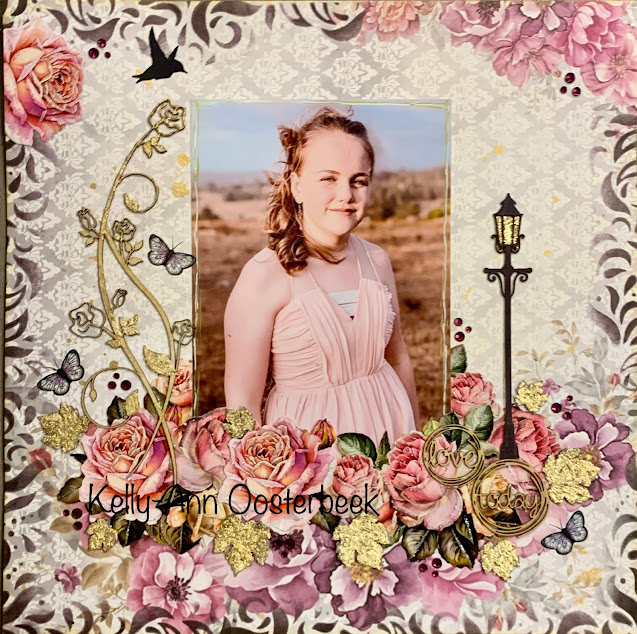
here I've pulled in a hanging light, a bunch of word tiles and a title I had been hanging onto for ages.


By inking them all brown it pulled the whole layout together nicely and complimented some of the more pronounced colours on the papers as well as complimenting the tones in the pictures. 


But something had to be done to address that giant teal shirt my son has on in the picture - it really dominates the whole scene, so I used a similar coloured paper for the border and linked the photo and borders together by adding this simple chainlink-fence backgound stencil and some teal ink.


I used the large stencil from this set for this page, but I usually use the middle size one for busier layouts with more on them (and the small one for cards). I ALWAYS buy my stencils in sets like this now for this very reason - I love the versatility of size variations. 


Simple, yet so effective for tying 
colours and elements of layouts together!


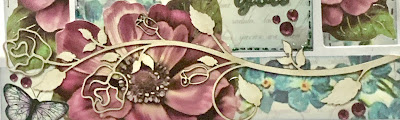
Next I'm sharing this very busy step card - 
that was quite a challenge for me to make!

 I made it for my wild and beautiful daughter and I was determined to make the card FOR her - which meant it couldnt really be my usual style.  My daughter is increadibly perceptive and if I made her a card in my usual style she would just brush it off as 'mum gave me one of her fussy cards' lol πŸ˜† 
So I had to create somethng here that reflected her personality ... 
Wild, messy and free!


The paper itself was more than enough all on its own but I was determined to add in some little touches that showed I had gone to effort. 
One of the Scrapmatts small 'Happy Birthday' titles was perfect for the main content.


And then to contribute to the overall 'messy garden' feel I added in this twig I had left over from this lovely branch and birds set. 


The other embellishments were pretty much just added to give it that 'I just wandered into this field of wild flowers' look. I struggled with how busy this ended up - even the number 'eighteen' at the top I woud have prefered to have mounted nicely on a backing strip and displayed prominitely somewhere, but once again, in an effort to make it less about me and more about the person recieving it, I atempted to relax a bit into a more casual style
πŸ’š


And thats it from me today folks... thanks for bearing with me to the end of my creative ramblings. 

I hope you enjoy your own creative adventures until next time. 


Cheers, Kel xo


Thursday, September 1, 2022

It's all in the details!


Hello creative community ...

I'm back again this month sharing some new creations - no themes this time, just some random pages and a step card I made recently. 

I'm actually on a mission at the moment to do something productive with a bunch of spare photos I have collected ... these have been kicking around in my study for a while so it's time for them to find homes on beautiful papers with some gorgeous detailed embellishments πŸ’š


This is what I love most about Scrapmatts chipboards and stencils - they are incredibly versatile as far as creating your own co-ordinating embellishments goes. All I really need these days is one nice sheet of paper, a patterned stencil for the background and some chipboards I can custom colour πŸ‘Œ


Some pink ink finished off these words perfectly!


And these leaf spray chipboards look awesome with just some 
gold coloured ink added then touched with brown on the edges.


I used gold ink on these lovely detailed chippies then filled the lamp 
with liquid pearls to give the finished product a luminescent feel.


...and of course I couldn't resist a little bit of background action -
using this cobblestone stencil and ground coffee coloured ink to 
add interest to the flat background paper.


Then there were the little extras I just keep shoving in! lol 😜

- I'm not a fan of doing lots of journaling on my layouts so simple
 expressive words like these help me convey meaning in my pages 
without all the extra writing πŸ’š


Here is my second offering - a layout put together with much the same formula as the last - 
* A beautiful sheet of paper
* A piece of card stock that helps tie in the colours in the photo
* A background stencil to lift my coordinating colour 
* A bunch of chipboard embellishments that compliment and convey meaning
* A few butterflies and flowers I just couldn't resist lolπŸ˜‰


These simple word pack are my go-to solutions for creating easy titles AND they save 
me a small fortune on buying elaborate procreated title embellishments.


I was keen to bring some of that blue into my background paper so I used this beautiful
stencil to lightly add a pattern to my background.


And the birds - of course - I truly believe that success lies in all 
these tiny details when it comes to creating beautiful unique layouts.


.  

My photo was taken on the banks of the Murrumbidgee River so I added in these lovely 
bullrush chipboards to compliment the photo
... the 'CAUTION - GIRLS AHEAD' sign was just added as good advice! 😜


And once more - I let these perfect and already finished chipboard words do my journaling for me...


And last but not least, I'm sharing a card I made for a very special friend...
She's a card maker too so really didn't need another Happy Birthday offering.
Instead I made sure I created something that would let her know how I feel about our friendship πŸ’™


These are the perfect size for the front of cards! 


Of corse I'm up to my old tricks here again - journaling the easy way with chippie words πŸ‘Œ


.  

Our favourite thing to do is sit and chat - this park bench will resonate with my mate when I give her this card - its s beautiful when you can communicate so much with one simple image! πŸ’™πŸ’™πŸ’™


It's been great sharing with you again, happy creating people.


Cheers,
Kel
xo


Friday, October 29, 2021

Everything that glitters

Well I cannot help but notice that all over blogs and social media at the moment are beautiful Christmas collections and projects. How fast this time of year comes around! lol

So I took the hint and got cracking on my photos from last Christmas too...


Here on this layout I have used chipboard embellishments to create the title and some simple flourishes that really lift the whole page. I'm currently in love with the rough golf leaf application look so I dug out my metallic foil confetti jar and got working...


How awesome is this effect!!?

I used the words from this AMAZING chipboard set and have the rest aside for another page or two.


The process of getting the 'gold leaf foil' on there is simple but OH SO MESSY πŸ˜‚
First I ink it with Gold ...


next I apply glue to where I want the foil to go, then it's just a matter of applying it bit by bit 
and tidying it all up at the end. 


I just adore this beaten metal look!


This technique can also easily be applied to non Christmas layouts of course ... 


Here's a vintage feel layout with a bit of an edge it it where I've used the gold leaf foil on actual leaves and to highlight the other chipboard on the page as well.

But my favourite look on this page is the fabulous flourish border pulling in from the edges...


Its a very easy technique to do with the help of this gorgeous square stencil.


This time with the leaves I did not add any ink first I just covered each one in glue and then 
layered the foil bits over them (dusting the excess edge bits away with a stiff paint brush).


Some of the extras like the circle words I used gold ink on...


And I made sure I backed he lamp post with some extra foil bits to give it a nice 'glow'.


For the rose vine I actually cut this chipboard in half at the centre.
I inked it all with gold but only applied the foil to a few of the leaves and a flower,
leaning into the shabby chic look a bit.


And of course I couldn't just leave that other half of the rose chipboard behind!
So I knocked up this 'Thinking of You' card to include it on.


These simple template stencils are still my favourite way of making cards.


Step cards are so fast and easy with this combination...

1) Make card from stencil
2) Stick Papers on panels
3) Add a chipboard title
4) add a chipboard embellishment.

Too easy! 


I couldnt resist a little bling here either and after I inked the chipboard title a pale blue 
I also added some Crystalina Kindy Glitz to the letters.

I left the chipboard rose natuaral though ( see it does happen some times 😜).


And thats it from me this month.
Thanks for popping over for a look xo 


Cheers from Kelly-ann